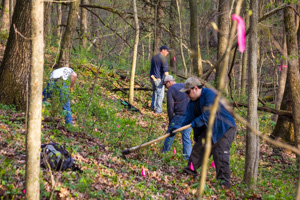
A short guide on how to prepare for a trail work day and tips to make the experience more enjoyable while keeping you safe.
What to Wear
- Long Pants
- Long Sleeves
- Sturdy Shoes/Boots with Chunky Tread
- Eye Protection
- Work Gloves
Other Items to Bring
- A light snack for longer (>2 hrs) work sessions.
- Water. Plan on drinking 0.5-1.0 L per hour when working in hot conditions.
- Sunscreen and a hat if working in open sunny areas.
- Bug repellent, the DEET kind, and bug head nets if working in the thick of mosquito season (June-Sept.).
Types of Work
Clearing & Grubbing - Clearing vegetation and debris from the planned trail corridor. Typically 4-6 feet in width. Stumps are removed that fall within the planned trail tread. Hand saws, chainsaws, & rogue hoes are best suited here.
Benching - Involves digging into the hillside to create a flat surface for the trail tread. This flat ledge is called a bench. Rogue hoes and flat shovels do a majority of this work.
Dirtwork - Creating berms, rollers, and other built up dirt features. Dirt is piled in the location of the feature, roughly shaped with a rake, compacted with a tamper, and the shape fine tuned using flat shovels.
Armoring - A trail hardening technique used in areas where severe erosion or mud is likely to occur. This involves placing natural stone or man made paving blocks in the trail to create a durable surface.
Rut Repair - Repairing footprints and tire ruts that hold water and keep the trails closed.
Trail Trimming - Cutting back encroaching vegetation to open up the trail corridor using pruning saws, loppers, and string trimmers.
Drainage Improvements - Improving trail drainage allows trails to open sooner and dry faster after rain. We shape trail so water can't pool on its surface and make mud. This involves clearing drains of sediment and debris, deberming areas of cupped trail to restore outslope, and installing new drains where needed.
Clearing Blowdowns - Trees fall down across the trails. We cut them out with saws.
Structures - Bridges, Boardwalks, Technical Trail Features, and more. These usually require a number of special tools and techniques and are typically left for more experienced builders.
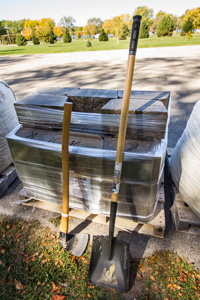
Rogue Hoe (left) Flat Shovel (right)
Trail Tools
Here is a short list of the most common tools we use to build trail and how they are used. Tools should be kept sharp to minimize effort.
Rogue Hoe - The workhorse of the trail building tools. A tough sharp hoe with the handle of an axe used for rough cutting of the trail bench, removing stumps and large roots, and digging in hard soils. Can also be used as a tamper, a rake, and axe.
Flat Shovel - The trail builders fine sculpting tool. Used to smooth out freshly benched trail, refine the back slope, and shape dirt features. Also used for digging (duh) and transferring material.
Mcloud - A rake, hoe, and tamper all in one tool. Used as expected.
Cutting Mattock - A axe/hoe combo used for grubbing and benching trail.
Pulaski - Another axe/hoe hybrid which is good for benching trail and removing stumps.
Folding Pruning Saw - Good for clearing branches and woody bushes. We find that 10" is about right for most trail work related tasks and the folding versions fit in a pocket when not in use.
Hand Tamper - Great for compacting berms, rollers, and other built up dirt features.
Landscape Rake - Used to rough shape berms, rollers, etc. Also useful for cleaning leaves, roots, and duff from bulk soil when building dirtwork features.
Trail Work Hazards
Being a volunteer trail builder is rewarding, good exercise, and great for the community but as with all activities some risk is involved. Here are a few of the common hazards that may be encountered when volunteering on a trail crew and how to minimize them.
- Creepy Crawlers - Ground bees, wasps, mosquitoes, and many other insects share the same spaces we build trail. If you are severely allergic to bee/wasp stings, please let the trail crew leader know in advance. Bug head nets and bug repellent containing high concentration of DEET will keep you from being eaten alive when the mosquitoes are most fierce (June-Sept.) . Also make sure to check yourself for ticks after work sessions!
- Perilous Plants - Poison ivy, stinging nettles, and numerous thorny plants are common to local woodlands. If you have questions about identifying these plants ask the crew leader for guidance. If you are very sensitive to poison ivy, it's a good idea to bring baby wipes, or similar, to wipe down with after the work session. Read more about Poison Ivy exposure prevention.
- Sharp Tools - A sharp tool is an efficient and safe tool, but must be respected. The edges of most hoes and shovels we use are kept very sharp to cut through tough roots and make digging easier. Consequently, they will do the same to any body parts that get in their way. Maintain enough space between those working around you so they will be out of the danger zone when using the tool (2 handle lengths is a good distance). Always carry tools with their sharp edges pointed away from the body, preferably towards the ground, and in the downhill hand. This will reduce the risk of falling on a sharp edge if you trip. When not in use, place tools with sharp edges facing the ground. If you are unsure how to use a tool, ask the crew leader for a demonstration.
- Heat - We try not to work during extremely hot/humid conditions, but when we do it is important to take frequent breaks and drink plenty of water to stop heat related injuries. We also typically cut work sessions short under these conditions.
- Fatigue - One of the biggest dangers when doing physically demanding work is fatigue. Fatigue causes lapses in judgement and reduced coordination which can cause accidents. Limit this effect by taking breaks when you need them. Don't feel compelled to work at a faster pace than you can comfortably maintain. A light snack, like a granola bar, and water will help limit fatigue during longer work sessions.
- Heavy Items - Lifting and moving heavy items, like logs and rocks, is serious business. Use proper lifting techniques and if the object is too large to move by yourself don't try to be a hero. Ask for assistance and prevent possible injuries. Also, never stand below or on the downhill side of a heavy object that is being lifted or moved. If it shifts unexpectedly, you are in its path.
- Uneven and Slick Surfaces - Trails are usually built in areas with hilly terrain and lots of debris on the ground. Before the trail is built, these obstacles can be a challenge to traverse without loosing balance or traction. Throw a little moisture into the mix and conditions can become downright treacherous. Footwear with good ankle support and chunky tread is recommended for trail work to keep you right side up and stuck to the ground.
Trail Work and Insurance
Insurance requirements can be a drag. Especially when all you want to do is head into the woods and build sweet trail. However, insurance is necessary to protect everyone involved and allows FORC to keep building and maintaining local trails. Luckily, FORC members are covered under a club insurance policy which allows for trail work related activities. Non FORC members must either join FORC to gain this coverage or sign a volunteer release waiver for the specific location they will be volunteering. Below are some of the volunteer waivers we have on hand. If you don't see the waiver you need below, ask the crew leader before the work day if one is available.
Volunteer Waivers
FAQ
- Can I bring my dog to a work day?
For the safety of your pet, please leave them at home. Sometimes we do potentially hazardous work (like clearing fallen/leaning trees with chainsaws) and unsupervised pets can introduce extra risk in these situations. We also use sharp digging tools which have high potential to injure if any pet were to wonder into a work area. - Do I need any previous experience to build trail?
Nope. If you can dig a hole you can build trail. If you're new, let the crew leader know and they'll give a quick tutorial related to the day's work plan. There will always be experienced builders around to answer questions and show you the ropes.